
If you want to create and debug MapReduce application using Java in IntelliJ IDEA then this guide will help you do just that. I’m not an expert in Hadoop. If you have any corrections or advice for me, please let me know in a comment and I’ll get it fixed.
Step 1 – Install Java SE Development Kit (JDK)
If already installed, skip to step 2. You can either Install Java SE Development Kit 7 or 8.
Download link: jdk-8u31-windows-x64.exe (64bit) or jdk-8u31-windows-i586.exe (32bit).
Step 2 – Build, Install, Configure and Run Hadoop in MS Windows OS
If you want to get your hands dirty, follow this link to to build a native Windows OS distribution of Hadoop from source codes or
- Download this pre-built and pre-configured version 2.3 of Hadoop for Windows OS.
- For simplicity, extract it into your root directory (i.e. C:\Hadoop)
Step 3 – Set Environment Variables
After you have installed the Java SE Development Kit (JDK) and Hadoop in Windows, you must set the JAVA_HOME and HADOOP_HOME environment variables to point to their installation directory.
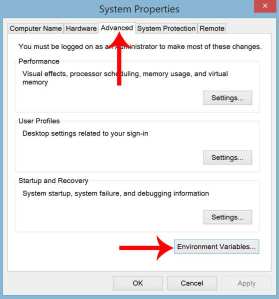
- Open your System Properties. Press the Windows key and R (which will bring up the run box) and type-in control sysdm.cpl

- Click Advanced tab then click Environment Variables button.
- Under System Variables, click New.
Enter the variable name as JAVA_HOME.
Enter the variable value as the installation path for the Java Development Kit (e.g. C:\Progra~1\Java\jdk1.8.0_31)
NOTE: If JDK installation path contains any space then use Windows shortened name (say ‘Progra~1’ for ‘Program Files’) for the JAVA_HOME environment variable.

- Repeat the above step but this time enter the variable name as HADOOP_HOME.
Enter the variable value as the folder where you extract Hadoop distribution (e.g. C:\Hadoop) . The path should not contain any space.

- Edit Path Variable to add bin directory of both Java JDK and Hadoop (i.e. C:\Progra~1\Java\jdk1.8.0_31\bin;C:\Hadoop\bin ).

- Click OK (thrice) to apply changes.


Step 4 – Download/Install IntelliJ IDEA
You can get the latest FREE version of IntelliJ IDEA Community Edition here.
Step 5 – Create Hadoop (WordCount) Java Application
- Start IntelliJ IDEA.
- Click Create New Project.

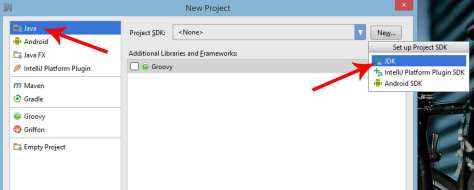
- Make sure the project type is set to Java. Select a Project SDK. If you don’t have anything available in the dropdown, then click New to set up new Project SDK . Select JDK.
- Browse and select your Java SE Development Kit 7 (JDK) installation folder. Default location is C:\Program Files\Java\jdk1.8.0_31 for Java JDK 8. Hit OK when done.

- Blindly, click Next twice. Before you click Finish, set your desired project name (e.g. WordCount) and project location (e.g. C:\CS383\WordCount).
- In the Project Explorer, right-click the src folder. Select New | Java Class. Type the name of your JAVA class (ex. WordCount.)

- Type your java code or for this tutorial type-in the WordCount.java code or paste the code from this link: http://hortonworks.com/hadoop-tutorial/introducing-apache-hadoop-developers.


Step 6 – Configuring Module Dependencies and Libraries
This is where you specify your module dependencies (i.e. Hadoop JAVA libraries).
- Press Ctrl-Alt-Shift-S or click File | Project Structure. In the left side of the Project Structure window click on Modules.
Click on the Dependencies tab then click on the + at the right of the screen. Select JARS or directories.

- Browse and locate where you extract your Hadoop distribution files. (e.g. C:\Hadoop .) Select all the folders under C:\Hadoop\share\hadoop folder.

- Repeat the above step but this time select C:\Hadoop\share\hadoop\commo\lib folder.
You should have the same screen as below.

- Hit OK to close the window.


Step 7- Setup Run/Debug Configuration
This is where you enter the path to the directory that contains your text files (input directory) , and a output directory as program arguments.
- Click Run | Edit Configurations to open Run/Debug Configuration window.

- Select + button and select Application.
- Type any name for the configuration name.
- Select or type-in WordCount as your Main class.
- For Program arguments, enter the name or path of the folder that contains your text file and the output directory.
For simplicity, create an input folder named inFiles inside your WordCount project folder (the Working directory)
NOTE: DO NOT create the output directory (Hadoop will create one automatically.)

- Hit OK to close the window.

Step – 8 – Compile your Hadoop (WordCount) Application
- Click the Run button (green arrow) or click Run | Run… menu to compile and run your Java application.

- Cross your finger.

If you successfully run without compiler errors you’ll get outFiles directory with a file called _SUCCESS and the results file named part-r-00000 that contains job result.
Author: Hebron Lorenzo

Thanks Hebron for the useful guide to setting up the Intellij IDE. Definitely helped get me started.
I’m unsure about the last part, which does not appear to invoke hadoop, but rather just the WordCount class directly.
My success running hadoop jobs so far requires jar’ing up the files and running “hadoop jar ….”, but I don’t see how this environment knows how to do that. Can you explain?
I added some additional config to the IDE to Build a Jar “Artifact”. Then I run that jar in hadoop outside this IDE in a normal Terminal. That all seems to work. But, still messing around with it.
LikeLike
Hi Kevin, when you run a Hadoop application inside an IDE, Hadoop will run in a stand-alone or non-distributed mode. In this mode the local MapReduce job runner and your application runs in a single Java Virtual Machine (JVM) with no daemons run and with storage using your machine’s standard file system. This simple setup makes it easy to test and debug your code. No need to run Hadoop Sandbox and using ssh in a terminal.
Sometimes you may have errors in your code and may need to have a look inside rather than scratching your head and figuring out what went wrong. Also, you may want to dive into Hadoop source code to get a feel of the implementation details and learn how a class works. That’s why it is useful to have an IDE at your disposal when you’re developing and debugging your code. Some of the IDE features and tools like auto-complete and breakpoints (check the value of class variables at runtime) can significantly help you in creating or debugging your Hadoop applications.
You may wanna read “Running Hadoop applications in virtualization environment” by Mirel Cosulschi, Mihai Gabroveanu, Adriana Sbircea
http://inf.ucv.ro/~ami/index.php/ami/article/view/511
LikeLike
step was easy to follow and and compilling here was way better .
thanks ….
LikeLike